
The common U.S. poster sizes include small, medium, and large formats ranging from 11×17 up to 40×60 inches, with ISO A-series equivalents like A3 through A0 covering similar sizes internationally. The single fastest way to choose is this: start with viewing distance, then match content density to size. A viewer standing two feet away reads an 11×17 just fine; someone across a lobby needs at least a 24×36 to catch the headline.
Here is a quick-pick reference before you go deeper:
- Counter or tabletop display: 11×17 (or A3) — bold headline, minimal text
- Everyday wall poster: 18×24 (or A2) — the most versatile standard size
- Lobby, window, or retail wall: 24×36 (or A1) — strong visual impact from 4–8 feet
- Conference session or trade show: 36×48 (or A0) — dense information at a distance
- Transit, bus shelter, or large event: 40×60 — designed for 10+ feet viewing
VistaPrint’s size guidance puts it well: let your primary goal drive the decision. Attracting foot traffic calls for bold visuals on a larger format; sharing dense information calls for a size where text stays legible at the expected viewing distance.
Table of Contents
- What does a standard poster size chart look like?
- U.S. standard poster sizes, explained one by one
- Print-ready specs: resolution, bleed, color, and file formats
- How do you choose the right poster size for your project?
- What DPI do you actually need at different viewing distances?
- Key Takeaways
- Why the “just pick the biggest size” instinct leads you astray
- PTT Music posters: finished art, standard sizes, ready to display
- Useful sources, printer templates, and where to check final specs
What does a standard poster size chart look like?
The table below covers every size you are likely to encounter, from the compact A3 through the large-format 2A0. Pixel dimensions are calculated by multiplying inches by DPI (e.g., 24 × 300 = 7,200 px). To add standard bleed, tack on 0.125 in per side — so an 18×24 becomes 18.25×24.25 in the print file. For millimeters, divide inches by 0.03937 or multiply by 25.4.
| Size Name | Inches | Millimeters | Pixels @ 300 DPI | Pixels @ 200 DPI | Pixels @ 150 DPI | Common Use |
|---|---|---|---|---|---|---|
| A3 | 11.7 × 16.5 | 297 × 420 | 3,510 × 4,950 | 2,340 × 3,300 | 1,755 × 2,475 | Flyers, counter displays |
| 11×17 (Tabloid) | 11 × 17 | 279 × 432 | 3,300 × — | — | — | Event flyers, menus |
| 12×18 | 12 × 18 | 305 × 457 | 3,600 × 5,400 | 2,400 × — | — | Photo prints, small retail |
| A2 | 16.5 × 23.4 | 420 × 594 | 4,950 × 7,020 | 3,300 × 4,680 | 2,475 × 3,510 | Classroom, office wall |
| 16×20 | 16 × 20 | 406 × 508 | 4,800 × — | — | — | Photo art, bedroom decor |
| 18×24 | 18 × 24 | 457 × 610 | 5,400 × 7,200 | 3,600 × 4,800 | 2,700 × 3,600 | General wall poster |
| 22×28 (Half-sheet) | 22 × 28 | 559 × 711 | — | — | 3,300 × — | Retail, movie half-sheet |
| A1 | 23.4 × 33.1 | 594 × 841 | 7,020 × 9,930 | 4,680 × 6,620 | 3,510 × 4,965 | Lobby, retail window |
| 24×36 | 24 × 36 | 610 × 914 | 7,200 × 10,800 | 4,800 × 7,200 | 3,600 × 5,400 | Event, retail, bedroom |
| 27×40 (One-sheet) | 27 × 40 | 686 × 1,016 | 8,100 × 12,000 | 5,400 × 8,000 | 4,050 × 6,000 | Movie theater lobby |
| 36×48 | 36 × 48 | 914 × 1,219 | 10,800 × 14,400 | 7,200 × 9,600 | 5,400 × 7,200 | Conference, trade show |
| A0 | 33.1 × 46.8 | 841 × 1,189 | 9,930 × 14,040 | 6,620 × 9,360 | 4,965 × 7,020 | Large-format display |
| 40×60 | 40 × 60 | 1,016 × 1,524 | 12,000 × 18,000 | 8,000 × 12,000 | 6,000 × 9,000 | Bus shelter, transit |
| 2A0 | 46.8 × 66.2 | 1,189 × 1,682 | 14,040 × 19,860 | 9,360 × 13,240 | 7,020 × 10,230 | Billboard-scale display |
Practical pixel examples: An 18×24 poster at 300 DPI produces a 5,400×7,200 px file — roughly 39 megapixels before compression. Drop to 150 DPI and that same poster becomes 2,700×3,600 px, a much lighter file that still prints cleanly when viewed from three or more feet. A 24×36 at 300 DPI hits 7,200×10,800 px; at 150 DPI it is 3,600×5,400 px. For most wall posters, 150–200 DPI is widely accepted by print practitioners without visible quality loss at normal viewing distances.
The PixExact poster size guide provides a thorough crosswalk of these dimensions if you need to verify a specific size before sending to a printer.
U.S. standard poster sizes, explained one by one
Understanding each size on its own terms saves you from printing something that looks great on screen but feels wrong on the wall.
11×17 — the large flyer
At 11×17 inches (279×432 mm), this is technically the “tabloid” paper size, and most office laser printers can handle it. The aspect ratio is roughly 2:3. Use it for event announcements, menus, or counter displays where viewers stand within two feet. Standard frames exist for this size, keeping display costs low. The catch: text needs to be large and sparse — cramming a paragraph onto an 11×17 at reading distance is a design mistake, not a size mistake.
12×18 — the photo sweet spot
Twelve by eighteen inches (305×457 mm) sits between tabloid and the everyday wall poster. It shares the 2:3 aspect ratio with 4×6 and 8×12 photos, so photographic artwork scales cleanly without cropping. Standard frames are less common than for 11×17 or 18×24, so budget for custom framing if display is the goal.
16×20 — bedroom and gallery art
The 16×20 (406×508 mm) has a 4:5 aspect ratio and is one of the most popular sizes for framed art prints. Standard frames are widely available at retailers like IKEA and Target, making it a practical choice for merchandise or home decor posters. Viewing distance of two to four feet suits it well.
18×24 — the everyday poster
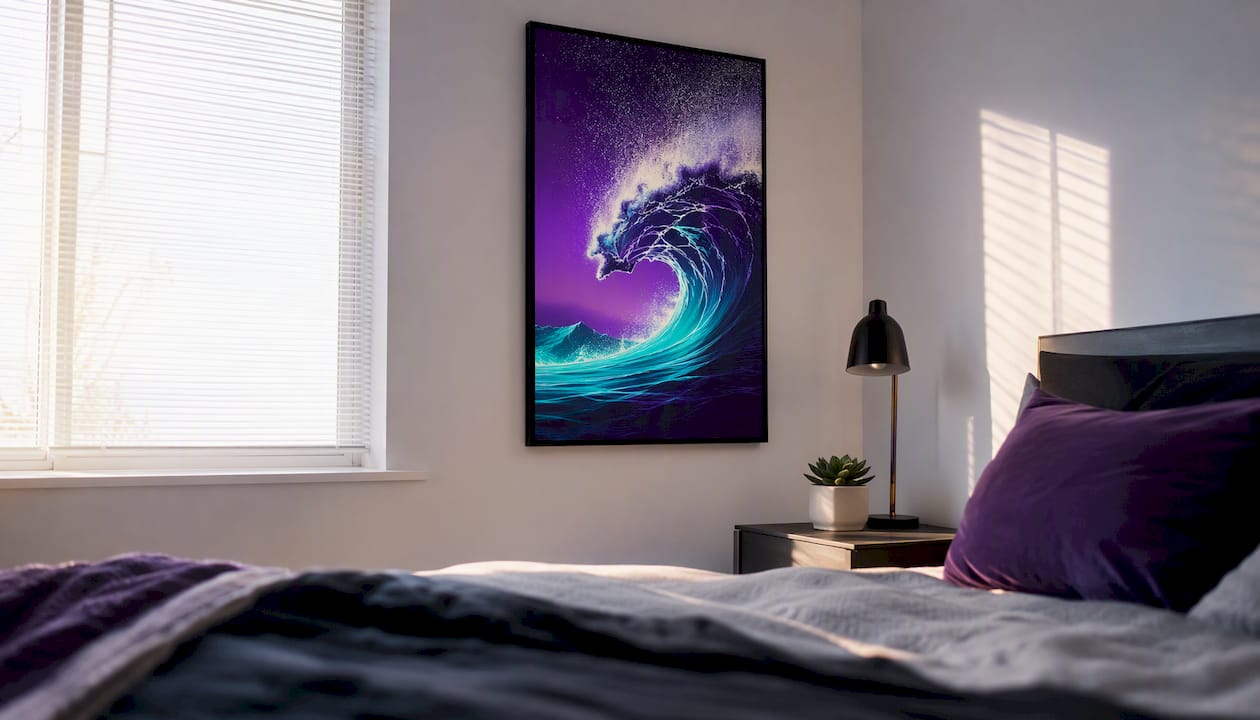
This is the workhorse of the poster world. At 18×24 inches (457×610 mm) and a 3:4 aspect ratio, it fits naturally on a bedroom wall, in a school hallway, or at a retail counter. Standard frames are manufactured for this size, which keeps framing affordable. For music merch, event promotion, or motivational art, 18×24 hits the balance between visual presence and cost.
22×28 — the half-sheet
The 22×28 (559×711 mm) is the classic movie half-sheet, used in theater lobbies and retail windows. Its roughly 4:5 aspect ratio works well for portrait-oriented photography. Standard frames are harder to find, so most half-sheets go into snap frames or poster rails.
24×36 — the statement piece
At 24×36 inches (610×914 mm), this is the largest size that still fits standard manufactured frames. The 2:3 aspect ratio mirrors full-frame photography perfectly. It reads clearly from four to eight feet, making it the right choice for retail windows, event backdrops, and large bedroom walls. File size at 300 DPI is substantial (7,200×10,800 px), so many designers work at 150 DPI for this size without sacrificing print quality.
Pro Tip: For 24×36 and larger, test a scaled proof printed on letter paper and taped to the wall at the intended viewing distance before finalizing your layout. What looks balanced on a monitor often needs more breathing room at full scale.
27×40 — the movie one-sheet
The 27×40 (686×1,016 mm) is the modern theatrical standard, the size you see in every movie lobby. Its 2:3 aspect ratio accommodates tall portrait compositions with room for title treatment, billing block, and release date. Custom framing is the norm here; standard retail frames rarely reach this size.
36×48 — conference and trade show
At 36×48 inches (914×1,219 mm), this format is built for distance. Conference poster sessions, trade show booths, and academic presentations all rely on it because the large surface area allows readable text from six to ten feet. The 3:4 aspect ratio is forgiving for both landscape and portrait layouts.
Print-ready specs: resolution, bleed, color, and file formats
Getting the size right is only half the job. A poster that prints with muddy color, white edges, or pixelated text wastes every dollar spent on printing.
Resolution and DPI by viewing distance
| Viewing Distance | Recommended DPI | Notes |
|---|---|---|
| Under 2 feet | 300 DPI | Close-up reading; maximum sharpness required |
| 2–4 feet | 200–300 DPI | Standard wall posters; 300 preferred for photo art |
| 4–8 feet | 150–200 DPI | Large wall posters; 150 DPI acceptable |
| 8–15 feet | 100–150 DPI | Lobby and event displays |
| 15+ feet | 72–100 DPI | Transit, bus shelter, billboard-scale |
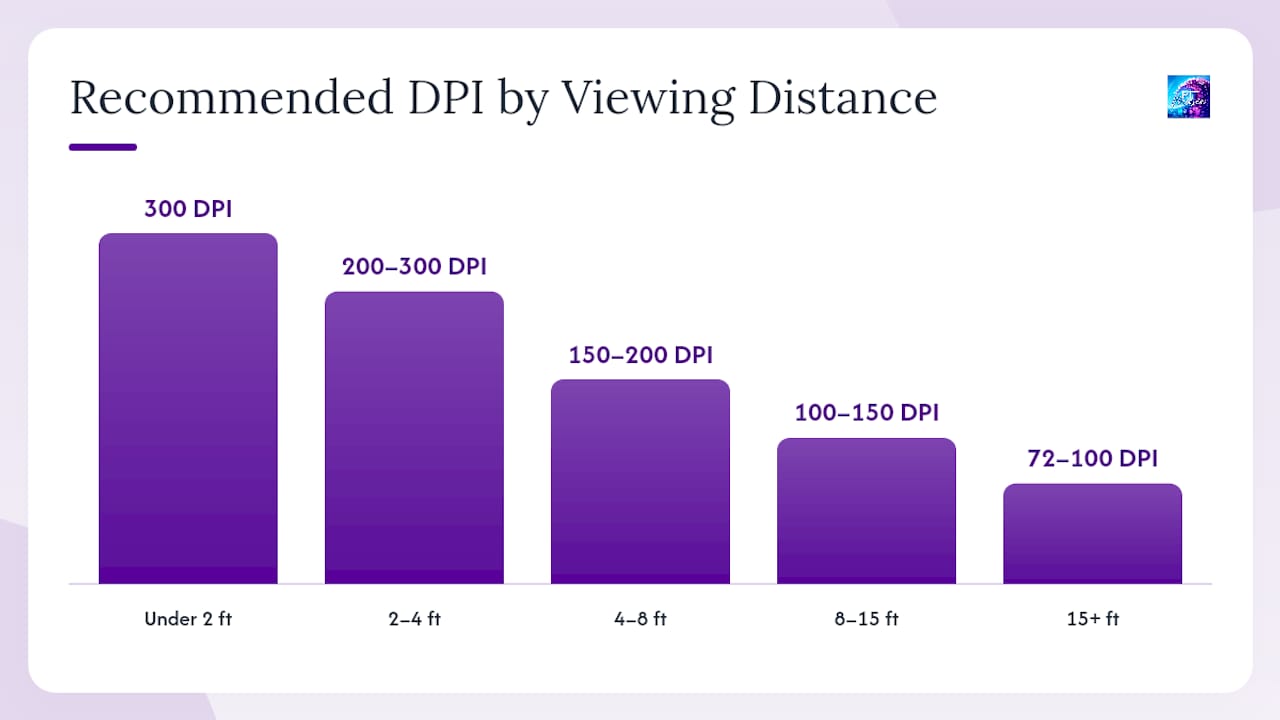
Practitioners widely accept 150–200 DPI for large wall posters viewed from three or more feet, keeping file sizes manageable without visible quality loss.
Bleed and safe area
Standard bleed is 0.125 in (3.175 mm) per side — the extra image area that gets trimmed after printing to prevent white edges. Some large-format printers request 0.25 in on pieces 24×36 and larger; always confirm with your shop. Keep all critical text and logos at least 0.25–0.5 in inside the trim edge (the “safe area”) so nothing important gets cut.
WallMockup’s bleed guidance explains why this matters: even a well-calibrated cutter has a small margin of error, and bleed is what stands between a clean edge and a white sliver.
Step-by-step: preparing a 24×36 poster for print
- Create a new document at 24.25 × 36.25 in (adding 0.125 in bleed per side) in CMYK color mode.
- Set resolution to 300 DPI — final pixel dimensions will be 7,275 × 10,875 px with bleed included.
- Place all critical content inside the 0.5 in safe margin from the trim edge.
- Add crop marks and bleed marks in your export settings.
- Export as PDF/X-1a, embed fonts, flatten transparencies.
- Name the file clearly:
ProjectName_24x36_CMYK_300dpi_bleed.pdf.
Pro Tip: For posters larger than 24×36, design at 50% scale at 300 DPI, then export at full size at 150 DPI. Your working file stays fast and manageable, and the output meets the printer’s resolution requirement for distance viewing.
How do you choose the right poster size for your project?
The right size is never just about what looks good — it is about where the poster lives, who reads it, and how far away they stand when they do.
Questions to ask your printer before you start
- What is your bleed requirement for this size?
- Do you have a template I can download?
- What is the maximum printable width on your press?
- Do you prefer PDF/X, TIFF, or another format?
- What color profile do you use (SWOP, GRACoL, or custom)?
- Are mounting and lamination options available, and do they affect the final trim size?
What DPI do you actually need at different viewing distances?
DPI, or dots per inch, describes how many printed dots fit into one linear inch of the final output. The higher the DPI, the sharper the image at close range — but at a distance, the human eye cannot resolve individual dots beyond a certain density, which is why large-format printing routinely uses lower DPI without any visible penalty.
The practical rule is straightforward: multiply your poster’s width in inches by the DPI to get the required pixel width. A 24-inch-wide poster at 200 DPI needs 4,800 pixels of width in the source file. Drop to 150 DPI and 3,600 pixels is sufficient. For a small 11×17 that someone reads at arm’s length, 300 DPI and 3,300 pixels of width is the right call.
Where designers run into trouble is applying close-up DPI standards to large-format work. Designing a 40×60 bus shelter poster at 300 DPI produces a 12,000×18,000 px file — over 216 megapixels — which is technically impressive and practically unworkable. At the intended viewing distance of 10 or more feet, 72–100 DPI delivers identical perceived sharpness. The PixExact poster size guide and kapa99’s practitioner notes both confirm this tiered approach as standard practice.
One more conversion worth memorizing: if your source dimensions are in millimeters, divide by 25.4 to get inches, then multiply by DPI. An A1 poster (594 mm wide) converts to 23.4 inches; at 150 DPI that is 3,510 pixels of width — a perfectly workable file for a lobby display.
Key Takeaways
The most reliable poster size decisions come down to three variables: viewing distance, content density, and whether a standard frame is available.
| Point | Details |
|---|---|
| Start with viewing distance | Under 2 ft: 11×17 or A3; 2–4 ft: 18×24 or A2; 4–8 ft: 24×36 or A1; 8+ ft: 40×60 or A0. |
| Use 300 DPI for close-up, 150–200 DPI for wall posters | Large posters viewed from 3+ feet print cleanly at 150–200 DPI, keeping file sizes manageable. |
| Add 0.125 in bleed per side | Standard bleed prevents white edges after trimming; large-format printers may require 0.25 in. |
| Stick to standard frame sizes | 11×17, 16×20, 18×24, and 24×36 all have widely available frames, reducing display costs significantly. |
| PTT Music posters ship in standard sizes | PTT Music’s store carries posters in standard sizes designed for easy framing and display. |
Why the “just pick the biggest size” instinct leads you astray
Here is a perspective worth sitting with: the most common mistake people make with poster sizing is not choosing too small — it is choosing too large for the content they have. A 36×48 poster with three lines of text and a logo does not feel bold; it feels empty. The white space does not read as confidence; it reads as an afterthought.
The sizes that consistently perform best in real-world display — the ones that stop people, hold attention, and communicate clearly — are the ones matched to the content density and the viewing distance. An 18×24 with a powerful image and a single headline at 72-point type will outperform a 36×48 with the same elements stretched thin every single time.
There is also a practical truth about music and event promotion specifically: your poster competes with everything else on that wall. A smaller, perfectly composed poster at eye level beats a large, sprawling one hung too high. Framing matters. Finish matters. The size is just the canvas — what you put on it, and where you hang it, is what actually moves people.
At PTT Music, we think about this the same way we think about a song: every element earns its place, or it does not belong. The right poster size is the one that gives your message exactly the room it needs, and no more.
PTT Music posters: finished art, standard sizes, ready to display
Designing a poster from scratch takes time, software, and a working knowledge of print specs. PTT Music has done that work for you. The PTT Music store carries finished posters in standard sizes — the same dimensions covered in this guide — printed with the kind of care that makes album art worth putting on a wall.
Every poster in the store is sized to fit standard frames, which means no custom framing costs and no guesswork at the frame shop. The artwork comes from the same creative vision behind PTT Music’s original music catalog, so what you hang on your wall carries the same energy and purpose as what you hear on Spotify, Apple Music, or any of the 150+ platforms where PTT Music lives. Whether you want something for your own space or a meaningful gift, the store makes it simple: choose a size, order, and display.
Useful sources, printer templates, and where to check final specs
Before you export your final file, these resources will save you from the most common print mistakes.
- Poster Size Guide 2026: Standard Dimensions in Inches, mm & Pixels | PixExact
- Poster Size Chart: Standard, Movie Poster & Aspect Ratio Dimensions | WallMockup
- Standard Poster Sizes: Inches, mm & Pixels (Chart)
- Poster size guide with useful design tips | Adobe Express
- A Guide To Standard Poster Sizes & Dimensions | VistaPrint US
- Design Wiki size guide - Canva
- The Ultimate Guide to Standard Poster Sizes & Dimensions
The single most preventable print error is submitting a file without checking the printer’s template first. Download it before you open your design software, not after you have already built the layout.